

4 days at Yosemite National Park!
Just Get off the couch and explore: Feel the rush of adrenaline and live the adventure of Half Dome
Yosemite is an easy drive from either Fresno or San Francisco. Rent a car at the airport and you are good to go!
Good info to know before you go:
Getting there: From Fresno - Highway 140 through Mariposa and along the Merced River. Enter at the SW portion of the Park at The Arch park entrance - just a 90 minute drive!
San Francisco is quite a bit farther along Highway 120 through Oakdale. Enter through the most popular park entrance-Big Oak Flat. There is much more traffic and a slower drive via the Tioga Pass (a winding road with steep inclines), BUT very scenic views of Don Pedro Reservoir - 3 hours 30 minute drive.
Accommodations: There are lots of hotel, motel and camping options at Yosemite. We opted for The Rush Creek Lodge. https://www.rushcreeklodge.com/ We decided on this hotel because it was right outside the Highway 120 West entrance of the park. It was STILL a 45 minute drive to reach the trailhead to hike, but it was a super close option for our needs. The rooms are fairly basic, but the pool is fantastic, there are free s'mores around the poolside fire pit every night, and it is very family friendly.
Parking:
Get your booty out of bed early arrival to score parking- we arrived by 6 am each day and were able to find a spot in both Yosemite Village and Half Dome (Curry) Village. This way you can avoid the entrance and exit lines and fees into the park each day too! Account for the 25 miles drive from the park entrance to Yosemite Village when planning your time.
Day 1:
If you did not get a permit for Half Dome:
There are tons of trails to hike, naturally. We opted for a Half Dome warm-up hiking on Upper Yosemite Falls . This may or may not have been a good idea...The hike itself is 8 miles round trip (including Yosemite Point) with an elevation gain of 3000 feet. This was NOT a warm up hike. It was challenging. Whose idea was it to hike this the day before Half Dome?! Yep- I was a little tired and sore...and salty...
Park in Yosemite Village or near Yosemite Valley Lodge for easy access. The trailhead is between both lots- but get there early to park! Space is limited.

Upper Yosemite Falls
This trail has very well constructed switchbacks to ease the elevation gain, but its very steep, very rocky and technical. Wear your heavy duty, sturdy footwear (high top boots) for ankle support! There are no water stations until you get to the top of the Falls (stream water - treatable with a filter). Bathrooms are at the trailhead only. You can get some great pictures of Half Dome and the Valley below here too!

Half Dome, waaaaaay back there….
Crowds thin out, thank god, as you get toward the top, but it can be very crowded for the first two hours of the hike. Get out of my Half Dome shot, people! Watch out for bees and mosquitoes along the trail - especially the at the top! The bees are vicious! There is a gorgeous spot at the summit to relax your feet in the stream. We started at 7:30am and were finished by 2:30- plenty of time to eat, hang in the hot tub and catch some ZZZZ's....
Day 2:
Half Dome, baby!
Half Dome is a MUST for every bucket list hiker. But, its not easy to get access to the iconic mountain. The Half Dome hike requires a permit for the ascent of Sub Dome and Half Dome- and only 300 permits are issued each day to control the crowds. Permits are issued via lottery system, which begins March 1-31 for the season. Check out details here: https://www.nps.gov/yose/planyourvisit/hdpermits.htm
Tip: our group of 8 people applied for the lottery ($10 to apply) with 2 different email addresses each, naming 1 trip "leader". NONE of us got a permit! Even in the "slow" season after Labor Day! Thousands of hikers apply every year, unfortunately. Luckily, one of our group members inquired with a tour company called Southern Yosemite Mountain Guides and we were first on the list for their permits! Each guide company is allotted permits as well, so be sure to use that as a back-up plan. This was the guide company we used- https://www.symg.com/index.php
There is also a lottery for each permit day offered two days in advance. Apply for this lottery before 1 pm two days prior to the day you wish to hike. They announce the permit winners later that day.
The last option is to take a chance and hike to Sub Dome and ask if any hikers have extra permits. People gather at the base of Sub Dome right before the Park Ranger checks permits. This is a great place to make friends and see if you can jump in on some else's permit. Each permit approved allows for 6 people to be named on it. Maybe someone chickened out? There is a high no- show rate, so anything is possible!
So you won a permit spot- now what?
The Half Dome hike is 14.2 miles to 16.5 miles depending on which trail you take. The Mist Trail is shorter but steeper and has long sections of climbing with man made stairs that can be slippery from the spray of Vernal and Nevada Falls. The Muir Trail is more gradual but longer and drier. We opted to take the Mist Trail up above Nevada Falls and then jumped on the Muir Trail all the way to Half Dome. On the way back we took the John Muir Trail to have a more gradual descent (tired legs) and to be safer in case we returned in the dark.
The Mist trail is a must for incredible views of the waterfalls and crazy valley views from the top. It is also less crowded....for a reason! It is not for the faint of heart! Plan for at least a 12 hour day. Be sure to pack plenty of food and water for the long day. There are only a few water sources and some treatable streams on the route. The last main option for water is at Little Yosemite Valley campground - the last backpacker campground on the way up to Half Dome. No camping is allowed from this point on to Half Dome. Camping here could be a good place to stop and camp if you plan on 2 days for the Half Dome hike instead of doing the whole hike in one day.
Where the Mist Trail is rocky steep and technical, the upper Muir trail takes you through pine forests and incredible trail sections above timberline. This is where the beauty of Yosemite and the scenery really rewards the hiker!

The Top of Sub-dome before we reach the base of Half Dome
The trail stops at the base of Half Dome sub dome where only those with a permit can go from this point. Sub Dome will lead you to the saddle of Half Dome and the start of the cable ascent. Hiking up Sub Dome is a strange experience, which starts off as stairs but then it turns to a unmarked scramble to a false peak. It is as deceiving as it is steep but totally walkable-and the traction is very good. It is a little shot in the arm for your nerves before the cables. This section can also get very crowded - especially on the first sections of stairs. By the time you get to the top of Sub Dome, you begin to see hikers just coming off Half Dome. (pictured above) Be warned: I asked two guys "how was it!?" Not expecting anything but total elation. One guy said "It was amazing!" But the second guy, looking far more pale and scared, said "It was the most terrifying experience of my life".
Greaaaaaaaaat.......
So it may not be a good idea, for your own psyche, to ask about another hikers experience unless they have a smile on their face!
Needless to say, the ascent up Half Dome is pretty terrifying. I am not going to lie- I started to cry. Out of fear. Out of the reality of the task at hand. (I always cry in daunting situations though- stress relief maybe?) We arrived about 11am at the base of the mountain and it was packed with people. That was one issue. The second problem was when you actually SEE the cables, and how steep the ascent is, you kind of start to panic. However, breathe, relax, and don't look down. Look OUT. Enjoy the view! I opted for counting the wood two-by-fours you rest on (65, by the way) to occupy my mind with something other than the scariness of the ascent.
Here is some gear I would recommend, as a pretty experienced hiker: Good boots with a rubber, vibram sole. You hike up a vertical slab of flat granite, so this is a must. Gloves- with a rubber grip, as necessary to grip the cables. We got ours for $2 bucks at Home Depot. Third, a gut made of steel- but if I can do ot, you can too!!! Lastly, dont forget your camera!
Anyway, after talking myself through the first 15 slats, 2 of our group decided to turn around and go back down. Listen, if you are not feeling it, just don't do it. It IS scary, but doable. However, the last thing you need is to have a panic attack in the middle of the ascent. Trust your gut, and live with your decision. I chose to suck it up and continue up the cables, and I am so glad I did.

Its a long way down…
As I mentioned, I counted slats, looked out and not down, and focused on my breath. The yoga teacher in me came out as I tried to find my drishti! I am sure I sounded like a crazy person as I mumbled to myself and remained laser focused on the vertical climb. (In my head I said “What the f*#^ am I doing! No joke)
The cables get very crowded with hikers coming down, as well as those you are hiking up with. It IS intimidating. Talk to each other! COMMUNICATE! It is safer for everyone that way.
Honestly, it was tremendously emotional for to reach the summit. I cried like a little schoolgirl on her first day of class!

This was a ledge at the top of Half Dome. Don’t look down! It was a little scary…
The surface of Half Dome looks like the moon- rocky, flat, and enormous! (Pictured below)
Its Instagram heaven up there! After chilling for a bit, having some lunch and taking loads of cool pics, we started the descent.

The surface of the moon? Nope- its the top of Half Dome.
We got stuck in a queue on the way- it was what I imagine it to be like on Everest! Someone below us had a panic attack. Breathe, be calm, and descend backwards. It was MUCH easier to go down facing the rock. I just slid down on the cables- similar to rappelling. We got to the bottom in no time at all (after the initial stall from the panicked hiker.)
Be warned....the hardest part of the hike is still to come....after the initial excitement is over, it is a LONG walk back. I got really tired and cranky despite some of the beautiful sites along the John Muir Trail. We made it back before dark- by 6:30, and grabbed food.
Speaking of food:
Food Options are few and far between. There is a Starbucks, (the chain has even invaded Yosemite! Urgh!) the Food Commissary in Yosemite Village, pizza, ice cream and BBQ in Half Dome Village (wait times on pizza and BBQ are up to 3 hours! So I hope you are not that hungry!) The Commissary had a decent variety and was a quick and convenient option when you are hungry enough to eat your arm off!
Day 3:
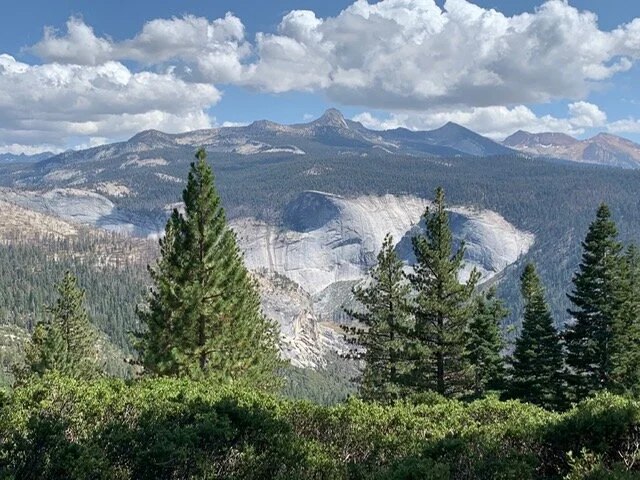
We were completely spent so we drove to Tuolumne Meadows and lazily hiked around. This could be Yosemite Valley's best kept secret! It is not heavily populated with tourists- its where the locals head to escape the crowds. There are tons of hikes to choose from.
Check this out: https://www.nps.gov/yose/planyourvisit/tmhikes.htm
It was a great way to chill out and wind down from the excitement of Half Dome. We soaked our legs in the lake water, took some pics of Half Dome from the “other side” and made our way out of town.

Tenaya Lake
We decided to head to an Airstream for our last night. It took about an hour to get there, sitting right outside a small town. Why not chill in a kookie accommodation instead of staying at a hotel one more night? Besides, it was closer to the airport!
It was a fun idea with all the comforts of home- just in a compact trailer sort-of-a-way.

AutoCamp Yosemite- MidPines, California